Do you want to earn money from selling advertising on your blog ?? Then you are at a right place !! Today I am going to review OIO Publisher WordPress Plugin (10% off coupon code) which helps you to sell your blog space directly for advertisement. You can make additional money from your website with this WordPress plugin.
This is one of the excellent solution to sell your advertisement. A review of OIO publisher WordPress plugin has all its advantages & disadvantages.
OIO Publisher WordPress Plugin
OIO Publisher is an ad manager that enables you to maximise your revenue, save time, and keep you in complete control of your ad space. Sell and serve ads on any website, using this PHP ad management script.It is one of the powerful script and WordPress plugin which you can use to create and manage banner and text ads on your website.
Why You Should Buy This WordPress Plugin ??
Well, it is a very difficult question but I want you to take some minutes to think about the hassles you were facing while selling your blog space for advertisement.If you sell your blog ad space manually then you have to negotiate with the person for price, time period etc.You have to add & remove ads manually on your blog which will waste your important time. You can save your time with the help of this WordPress plugin. Let’s talk about the features of this plugin.
Features:
- Easy to install OIO publisher as a WordPress plugin or standalone platform
- Custom purchases allow you to sell digital products.
- Convert website visitors to sales staff using the inbuilt affiliate program
- Run 3rd party ad networks alongside your own ads
- Keep 100% of your revenue, forget middleman commission
- Sell all forms of text ads, banner ads, and paid reviews.
Time Saving Features :
- Entirely automated, all ad purchases and expiration handled automatically
- One – click ad management lets you spend more time on other things
- Integrated marketplace helps you to sell your ads
- Click and impression tracking, plus weekly ad reports emailed to advertisers
- You can easily this plugin using web installer
What are the Installation Requirement of OIO Publisher??
To Install OIO Publisher, you must have a php compatible web hosting available to install it.You must have a website where you can easily upload any scripts like OIO.
If you are using a hosting blogging account platform ( for example wordpress.com or blogger.com ), you must have your own hosting account (eg dreamhost,hostgator ) as well, in order to use OIO with them.
Your web host must be compatible with the PHP 4.3 or above, and MySQL 4.1 or above .If you are installing as a WordPress plugin, your server will already meet both these conditions.
What Things You Can Customize In OIO Publisher ??
You can easily customize your ad zone with the help of Javascript & PHP codes.You can now use custom options in your ad code to change various things about how the ad zone looks. Below is a list of all the options you can use with your ad code ( both PHP & Javascript ).
- Title
- Rows & columns
- Width & Height
- Alignment, Border, spacing
- category (limits ads shown to the category ID(s) used)
- purchase (limits ads shown to the purchase ID(s) used)
- shuffle (if set to false, ads will not rotate)
- show (all, purchases, defaults) etc….
How to Start Using OIO Publisher In 5 Simple Steps :
So, You have decided to use OIO Publisher on your website for selling ad space then these simple steps will help you to set up OIO publisher within minutes without any issue.
- You have to install OIO on server before using it. It can be installed as a standalone application or as a WordPress plugin, depending on your needs.There are 2 ways to install OIO publisher on your blog.
- Just Go to this Link and download & install OIO publisher manually
- Most of the people use the web installer to install OIO Publisher on their blog
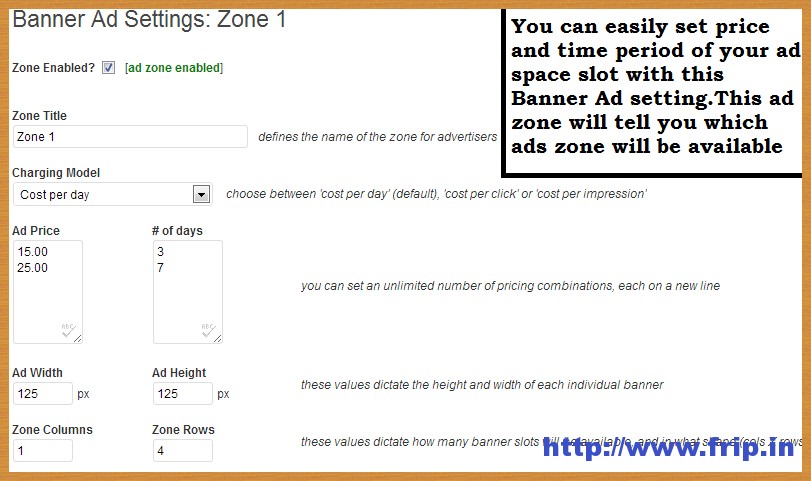
- Set up your ad zone, you may be thinking what is ad zone ?? Ad zone an ad zone is a group or grid of ads, all of the same size. A common example would be the 125×125 ads you often see on a blog’s sidebar. Imagine the sidebar contains a group of 6 ads, in a grid of 2 columns and 3 rows – that‘s an ad zone!
- You can easily create Ad zone , just follow these steps :
- Sign in to the admin area of your OIO install and click on the “Ad zones” section, followed by the “Banner Ads” menu option.Check out the below screenshot.
- You’ll be presented with a screen to let you create and modify the ad zone – the first one is already partially setup for you, to give you a head start.
- Now you have to focus on “columns”, “rows”, “width” and “height”.If you have put correct options in those options – 2 columns, 3 rows, 125 width, 125 height
- There is no option available for adding spacing between ads
- You can easily display ads on your website anywhere as per your requirement.To display ad code on your website, just copy the ad code and paste it in the location you’d like to show the ads.You can also OIO ad zone widget to display ads on your sidebar.
- Now it’s time to set prices for your ads space, Simply go back to your admin area and specify price according to your desire.You can actually specify any number of price / duration combinations (eg. $30 for 7 days, $80 for 30 days).
- Last step, its time to setup your payment method, the most recommended method to accept payment is Paypal. Just go back to admin area and set your payment method to Paypal.
Note : You can create a new purchase directly from the admin area. Go to the “Purchases” section of the admin area and click on one of the ‘create new’ links. Fill in all the details, and the ad will be placed in the zone you choose as a purchase (no payment required).
OIO Publisher Stats Module
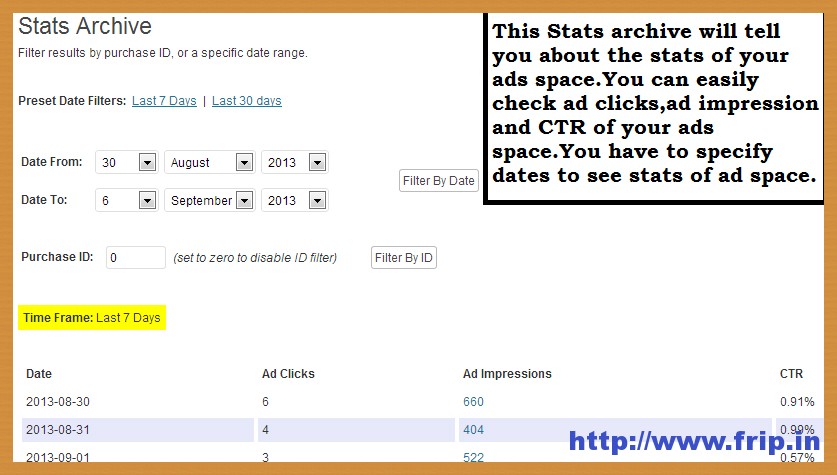
The OIO Publisher stats module tracks clicks and impressions for every ad purchase.It includes the ability to send a weekly stats report to advertisers, and filter what type of traffic is recorded.
You can easily access the Stats module by going to the module options. This module is split into 3 sections :
- Overview : It allows you to view all accessed stats, as well as filtering them by date or purchase ID.
- Settings :You can easily control basic setting such as whether to send weekly advertiser reports, and whether to send stats to the OIO marketplace.
- Live Stats : It lets you view the raw data recorded for the current day.
Advertiser Dashboard
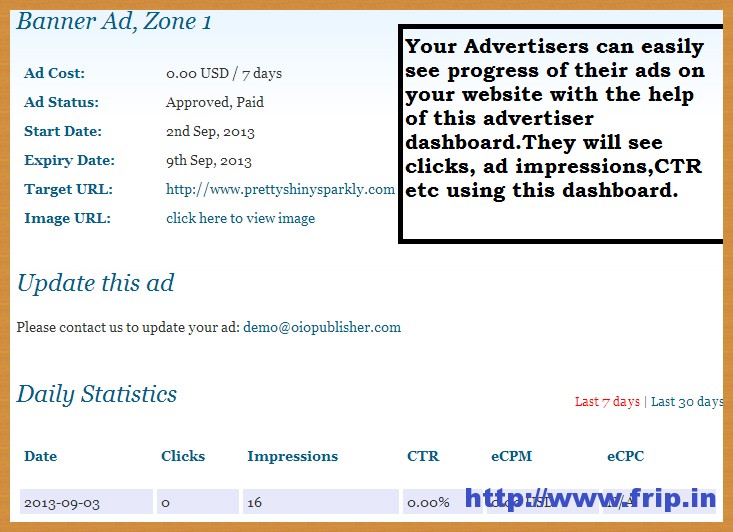
Don’t try to fool your advertiser, they can check all the details related their ads with the help of Advertising Dashboard. OIO Publisher also helps advertiser to see whether their ads getting click, impression or not ?? With the help of this Dashboard, your advertiser can easily check following things :
- Daily Statistics of ads including ads impression, clicks,CTR, eCPM, eCPC etc.
- They can easily arrange the stats with custom date range.
Coupon Code:
Offer : You will get $10 Discount on OIO Publisher WordPress Plugin with our exclusive coupon code below
[drpcoupon name=”OIO publisher” exclude=”name,expiration,description”]You will get $10 Discount on OIO Publisher WordPress Plugin.
Conclusion:
Every WordPress plugin comes with its own advantage & disadvantage.The advantage of OIO publisher, it enables you to maximise your revenue, save time, and keep you in complete control of your ad space.If want to make money with this plugin, I suggest you to install this plugin when you have good readership & great amount of traffic. This plugin is not good for those bloggers who were still learning “how get traffic to their blog”.
In the last, the major disadvantage of this plugin is it cost money. This plugin will cost you $47 which is very huge for such a single plugin. Don’t worry, this is one time payment, you will get lifetime updates & upgrade of this plugin.


Visitor Rating: 5 Stars